

Submitting Samples
You may submit digital samples, physical plant samples or a combination of both to the Plant Disease Clinic. A sample should represent a single problem. Please read our terms and conditions on submitting a sample.
Plant problem diagnosis samples fee: in-state $35. For samples originating in U.S. states other than Virginia: $70. See “Out-of-state samples” section for more details.
The fee must be paid before submitting a sample to the Plant Disease Clinic. See “Paying the Plant Disease Clinic Fee” section. Your local Virginia Cooperative Extension (VCE) office can assist clients with submitting payment, physical and/or digital samples to the Plant Disease Clinic.
All samples must be accompanied by a completed Plant Disease Diagnostic Form (SPES 361 Pub #450-097). See section “Completing the Plant Disease Diagnostic Form” below.
1. Contact your local VCE office, agent or staff member who can assist you with the submission process and provide a Plant Disease Diagnostic Form (SPES 361 Pub #450-097). See section “Completing the Plant Disease Diagnostic Form”
2. Pay the $35 diagnostic fee (See payment section below).
3. For options on submitting a digital sample, a physical sample or a combination (digital + physical sample) [Refer to the "Sample Types” section below].
3.1 Digital sample: Review the Guidance on Submitting a Good Digital Sample, your local VCE agent/staff can upload images to the Plant Disease Clinic’s database. (Refer to “Digital Sample” section below).
3.2. Physical sample: Carefully review the “Collecting a Plant Sample for Diagnosis” and “Packaging a Plant Sample for Shipment” sections below. Your local VCE office can help you navigate this process as well. (Refer to the”Physical Samples” section below.
3. 3. Combination sample (a digital + a physical sample): Follow instructions for both (Sample types section, digital samples and physical samples subsections).
3.4. Packaging and shipping can affect sample integrity and greatly influence what tests are possible. See our recommendations in the collection, packaging, and shipping plant samples sections.
4. After your sample has been diagnosed, you will receive an electronic report. (Refer to the “The Plant Disease Diagnostic Report” section below).
- The fee must be paid before submitting a sample to the Plant Disease Clinic. Proof of payment (copy of payment receipt ) must be provided to the Plant Disease Clinic either electronically or physically.
- The in-state charge for diagnosis (whether digital or physical or a combination) is $35.00, which must be paid before submitting a sample to the Plant Disease Clinic.
- The $35 fee covers a single plant problem, but a sample may consist of more than one plant representing the same problem.
- Payment must be made by one of these two options:
- Credit card through Destiny One payment website instructions at https://bit.ly/3IV6HlX); OR
- If in touch with a VCE agent/ local VCE office’s or wish to pay with cash or check at your local VCE office.
The Plant Disease Clinic does not accept cash or check payments, nor invoice.
- No refunds will be given for samples submitted to the VT Plant Disease Clinic, regardless of whether a specific diagnosis was possible for the sample. (See the terms and conditions).
- Diagnosticians will instruct how to resubmit samples deemed “insufficient for diagnosis” in the report (only the same problem may be resubmitted).
- Include the digital or printed diagnostic report with the follow-up sample.
- A physical sample submitted as a requested follow-up to a digital sample will not incur an additional fee.
All samples must be accompanied by a Plant Disease Diagnostic Form (SPES 361 Pub #450-097). See Instructions for Completing the Plant Disease Diagnostic Form . Please fill out as many fields as appropriate. The form may be completed electronically (PDF) OR printed and completed as a hardcopy.
Given that our laboratory diagnosticians cannot observe the plant in the field/landscape/nursery location, the information provided on the form is crucial to help ensure an accurate diagnosis of samples and an appropriate control recommendation.
Please complete both pages of the form as accurately and thoroughly as possible. Your local VCE office can provide the Plant Disease Diagnostic Form, and step-by-step instructions for completing the form are available.
The Virginia Tech Plant Disease Clinic has a USDA-APHIS permit to receive plant samples for disease diagnosis from other U.S. states in the continental United States. The out-of-state plant problem diagnostic fee is $70; proof of payment is required with the sample submission.
The permit has specific requirements for documentation and packaging. Out-of-state samples not adequately packaged will be destroyed without examination. Follow our packing and shipping instructions, and please abide by the following:
- Double-bag the sample.
- Enclose a copy of the sample submission form with our permit number displayed at the top (contact the Plant Disease Clinic for this number).If you are using a handwritten form that lacks the permit number, enclose a copy of the first page of the permit itself.
- Place the sample in a sturdy cardboard box with all the seams taped closed.
- You may use newspaper or bubble wrap to cushion the sample, but shredded paper and foam packing “peanuts” are discouraged.
- Send the sample early enough in the week so that it is not in transit over the weekend.
- Contact clinic@vt.edu to inquire about specific testing before sending samples and to obtain a copy of our permit to include with the sample. We may not be able to receive plant rootballs, including soil, from specific quarantine locations.
Sample Types
A digital sample provides essential background information that is very helpful for the diagnostic process. Some problems can be accurately diagnosed from images. In some instances, you will receive a quick answer without having to send a sample. If a physical sample is recommended for testing, details on the type (plant parts, amounts, etc.) will be provided. There is no additional charge for sending a follow-up physical sample after a digital sample has been submitted. We encourage the submission of a digital sample even when a physical sample is being mailed.
Digital Samples
- Digital samples should be submitted through your local local VCE office. Email (or provided by other means) the images to your local Extension agent, along with a completed Plant Disease Diagnostic form (#450-097), which can be obtained from your local VCE office.
- Please review the VT Plant Disease Clinic’s Guidelines for Submitting a Good Digital Sample to the Plant Disease Clinic before submitting a digital sample.
- If your local VCE agent can diagnose the problem, there will be no charge for diagnosis.
- If the sample needs to be submitted to the Plant Disease Clinic, the client will need to prepay the fee and provide a receipt for payment to the local VCE office staff or agent.
- Once payment has been made, the VCE Extension agent or staff will submit the digital sample, the diagnostic form and payment receipt to the Plant Disease Clinic’s database for review.
- If, upon review of the digital sample, the diagnostician determines that other information/item(s) are needed (e.g. better images, a physical sample, additional information), a request for such item(s) will be sent to the client (if an email has been provided) AND the relevant VCE agent/staff. The client will incur no additional charge for submitting the requested items.
Left: Well Focused close up image, Middle: overall image of the whole plant, Right: bottom Image of the plant in the landscape.

Left: Overall image of the symptoms on the plant. Right Pattern of the problem in the field.

Left: Overall image of the symptoms on the plant. Right Pattern of the problem in the landscape

Examples of well-focused close-up Images

Physical Samples
- The process for submitting physical samples is similar to the process for submitting digital samples; however, the client can package and send the sample directly, if they wish, and include proof of payment (receipt).
- It is recommended that you work with your local VCE office when submitting any sample. It may be possible to diagnose the problem at the county level, in which case there will be no fee, OR office staff can assist you in ensuring the best sample for accurate diagnosis is submitted.
- If you work with the local VCE office, the office may package and ship your sample to the lab.
- Whether you send the sample yourself or submit it through the local VCE office, you must prepay for the sample(s). See Paying the Plant Disease Clinic Fee section above.
- Remember to mail physical samples early in the week to avoid delays in the mail and to include a completed diagnostic form and payment receipt in the package.
- The accurate diagnosis of plant disease is highly dependent upon receiving a sample that is both appropriate for diagnosis and in good shape.
- Wet foliage should be blotted dry with a paper towel before packaging to avoid secondary rot during shipment.
- Package the sample appropriately
- Ship early in the week to ensure receipt of a sample in the best condition possible. If dropping off in person do so weekdays from 9am to 4 pm.
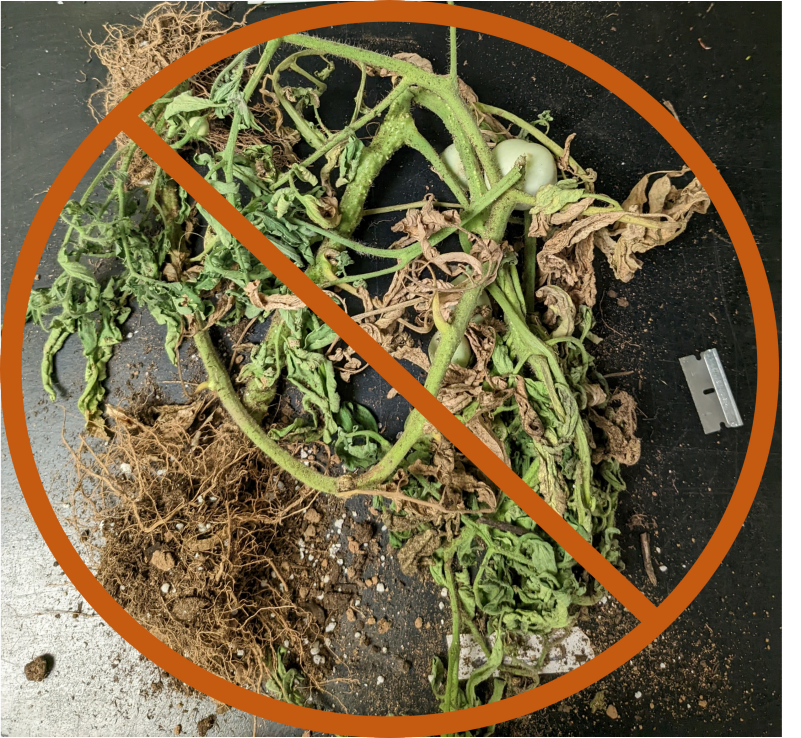
- When a sample is received, that is severely wilted, dried, crushed, broken, covered in soil, rotting and/or in advanced stages of decay, accurate diagnosis is usually impossible.
- Avoid exposure to high temperatures after sample collection and, if not shipping immediately, store in a refrigerator.
- Collect tissue from a plant in an early stage of symptom development or decline.
- When practical, submission of a whole plant, including the root ball, is highly desirable.
- As of May 2025, parts of central and southeast Virginia are under Imported Fire Ant Quarantine (see map). Movement of soil, roots, and similar materials is restricted. If your plant problem is from a listed county, please send a digital submission BEFORE mailing any soil or roots.
Dig plants; do not pull them out of the ground. Shake loose soil off gently, leaving at least a pint around the root ball.
Root balls with soil should be placed in a plastic bag that is tied off at the base of the plant to keep foliage clean and to avoid drying of root tissue.
Place the whole plant in another plastic bag.
See specific recommendations by sample type in the sections below.
DON’T do the following:
Don’t send plants that are dead.
Don’t send samples at the end of the week (keep refrigerated until mailing on Monday) or before a holiday.
Don’t wrap samples in wet paper towels or add water.
Don’t package the form with the sample—keep it dry and undamaged.
- Don’t assume a soil sample includes roots: check to ensure adequate roots (a large handful) in the soil.
Collect a dozen or more plants.
Keep foliage clean and roots protected by wrapping the roots andsoil/media in plastic wrap.
Then place whole plants in another plastic bag.

- Send 3-5 plants since roots and/or stem tissue may need to be cultured on multiple types of culture media and adequate root/stem tissue will be needed.
- Is your plant problem from a fire ant quarantine county? Send digital submission BEFORE mailing soil or roots—see the sample collection tips section above.
- Dig plants and gently shake off loose media/soil, keeping at least a pint of media/soil with the roots.
- Keep foliage dry by wrapping the roots/soil in plastic wrap.
- Place the whole plants in another plastic bag.

Example of delicate plant sample packing

- Sectioning can work. Cut the stem about 12” above the soil line.
- Is your plant problem from a fire ant quarantine county? Send digital submission BEFORE mailing soil or roots—see the sample collection tips section above.
- Dig the root ball and gently shake off excess soil, leaving at least a pint of soil on the root ball.
- Place the root ball in a plastic bag and tie off at the base of the stem.
- Place the stem and root ball in another plastic bag.
- Collect symptomatic stems with leaves and place in a separate plastic bag.
We welcome whole plants in containers. If mailing put a bag around the pot and secure them with an ok rubber band or twisty tie to keep the soil from dislodging in transit. Alternatively, pull the plant from the container, shake some to most of the soil, and bag the root ball, do not separate the root ball from the plant.

Make sure always to contain the root ball in a bag. When soil is not contained, it contaminates the leaves and stems and accelerates decay in transit, hiding symptoms and compromising our ability to test for pathogens.
- Consider starting with a digital submission first before collecting samples (see digital sample submision section above). Vascular wilts require a very specific sample for testing.
- Is your plant problem from a fire ant quarantine county? Send digital submission BEFORE mailing soil or roots—see the sample collection tips section above.
- Roots can be collected separately.
- Dig a large handful of the fibrous roots and place in a plastic bag with at least a pint of soil from the root zone.
- Collect symptomatic foliage/branch samples (with leaves still attached to stems to keep leaves fresh) and package in a separate plastic bag.
- Include 5-10 sectioned branches (10-12 inches long and 1/4-1 inch in diameter) actively cankered, or blighted/wilting, and twigs with leaves attached.
- Example of vascular discoloration can be seen in figure 15 on this US forest service publication
- Many tree problems are difficult to diagnose, since the whole tree cannot be examined. Many trees slowly succumb to wood decay organisms or suffer from multiple injuries (both abiotic and biotic in nature) over many years that lead to a gradual decline. Laboratory diagnosis of these types of tree problems is often not possible, and trees with these types of problems are not likely to recover. Consulting a local certified arborist may be more appropriate in such situations. Branch cankers, leaf spots/blights, fungal root rot diseases and bacterial leaf scorch are examples of some problems that we are generally able to diagnose. It is advisable to discuss submission of a particular tree problem with your local VCE agent/staff before submitting a sample to the Plant Disease Clinic.

Include 5-10 sectioned branches (10-12 inches long and 1/4-1 inch in diameter) actively cankered, or blighted/wilting, and twigs with leaves attached.
 actively cankered, or blighted/wilting, and twigs with leaves attached.")
Avoid sending only completely dead tissue and smaller diameter twigs, an insufficient sample for testing.

- Collect samples when symptoms are active. Submitting a sample in cool months (November to March) for problems noticed during mild to warm weather (spring, summer, or fall ) often results in an insufficient sample.
- Every physical sample MUST be accompanied by digital images of the overall pattern of the problem in the lawn, field, or golf course (see examples below).
- Locate a symptomatic section of turf that includes the junction of healthy (green) and affected (browning/yellowing) turf (see example below).
- Collect turf sample when you first begin to notice the problem. Many turf pathogens are active at different times of the year. If you wait too long the pathogen may not be active and accurate diagnosis may not be possible.
- Is your plant problem from a fire ant quarantine county? Send digital submission BEFORE mailing soil or roots—see the sample collection tips section above.
- Carefully dig the section to include roots and soil with the leaf blades. The section should be approximately 6”x6” to 8”x8” and include the junction of healthy (green) and affected (browning or yellowing) turf. The section should be carefully dug out of the lawn to include a 3” to 4” deep portion of the roots and soil. (Golf courses can submit cup-cutter samples that include such a junction.)
- Wrapping the section in aluminum foil (best), clear plastic wrap or a sturdy plastic bag that will keep the soil in place so it doesn’t contaminate the leaf blades is recommended.
- Package with padding (e.g., newspaper, bubble wrap, etc. ) in a box to avoid damage during shipping.
- Mail early in the week to avoid deterioration of the sample.
- DO NOT submit samples treated with fungicide(s) recently (within 1 to, preferably, 2 weeks) since this could suppress a pathogen and make accurate diagnosis unlikely.
Examples of images of turfgrass showing the pattern of the problem in the landscape.

The yellow box shows an example of the section of turfgrass needed for the most accurate diagnosis: a 6” to 8” rectangular section of turf that includes the junction of healthy (green) and affected (browning or yellowing) turf. The section should be carefully dug out of the lawn to include a 3” to 4” deep portion of the roots and soil. It is best to wrap the section in aluminum foil to keep soil off of the leaf blades during shipment.
 and affected (browning or yellowing) turf. The section should be carefully dug out of the lawn to include 3” to 4” deep portion of the roots and soil. It is best to wrap the section in aluminum foil to keep soil off of the leaf blades during shipment.")
A good turf sample, which includes green and yellow to browning foliage, soil, and roots, that was submitted to the Plant Disease Clinic. Importantly, it was wrapped carefully so that soil did not contaminate leaf blades.

Examples of a poor turf sample. left : small amount of turf, no junction of healthy and affected turf, no soil and few roots and leaf blades. right: soil not contained, mixed with leaf blades in transit.

- Plant samples should be sealed in a plastic bag with soil contained in a separate plastic bag (a root ball can be placed in a plastic bag that is tied off at the base of the stem) to avoid soiling/damaging foliage.
- Tissue that is wet will rot during shipment, so blot dry any foliage that is wet and include a dry paper towel to absorb excess moisture.
- Enclose the completed Plant Disease Diagnostic Form (#450-097) and proof of payment in a plastic bag (to protect it from moisture or damage in the package).
- To prevent damage in transit and ensure plant tissue is in the best shape possible when received by the laboratory, appropriately packaged samples.
If not mailing overnight, add cold packs on the branches to keep the sample cool, especially during the hottest months (July, August, Sept.). Place the submission on a separate bag to project form fading as cool packs thaw.
. Place the submission on a separate bag to project form fading as cool packs thaw.")
Example of a sample ready for shipping. Include samples enclosed in bags, a completed submission form, and add packing material (packing paper/newspaper, packing peanuts, bubble wrap, or any clean packing materials you may have handy)
")
Ship plant samples early in the week and use the fastest possible courier (overnight or next-day delivery, highly recommended), so the sample does not deteriorate in transit for more than a day or over the weekend.
If samples are collected or received (at the county office) late in the week or before a holiday weekend, store them in a refrigerator for shipment early the following week.
Many commercial producers send samples directly to the clinic, because mailing delays can affect sample integrity. Extension offices may occasionally experience delays due to limited staff or resources.
The Diagnostic Report
The plant disease diagnostic report will be sent electronically to the email address included (if a legible and correct email address) on the Plant Disease Diagnostic form.
If you were assisted by a VCE agent or MG help desk and their email is in the submission form, they will also receive a copy.
Various lab techniques are used to identify fungi, bacteria and other plant pathogens. Some pathogens can be identified relatively quickly (e.g. by microscopic examination), while others may require a longer process for identification (e.g. diagnosis by molecular techniques, culturing, carbon utilization analysis, etc.). Diagnosing abiotic (non-living) problems often takes longer than identifying a biotic problem, since there may be a longer process of elimination.
Diagnosticians also frequently consult with other specialists who may have specialized expertise on a particular problem and/or crop/plant type, which can also add time to the diagnostic process.
- Therefore, a client may receive a diagnostic report within a few days to two weeks of sample submission (3- 14 days). If you are still waiting to receive a report within two weeks, please contact your local VCE office or agent/staff member who can check with the Plant Disease Clinic on the status of the sample.
If you have questions about the diagnosis or recommendation after receiving the report, please contact your local VCE office or agent/staff member for assistance.